Do you ever wonder if you spend altogether too much time online? Well, if you do you should stop reading right now because I have found a new addiction. I was first introduced to Pinterest after reading my friend Emily's blog. Her blog is very inspiring to me because she is a gifted writer, has great recipes, and is a very talented homemaker and decorator. A few weeks ago she mentioned Pinterest on her blog and at the time I just glanced at it, but didn't really spend a lot of time there. Then my friend Wendi mentioned how much time she was spending on Pinterest, so I decided I needed to look around some more. Bad idea! ;-)
How do people come up with these ideas? Who would have thought that a virtual pinboard could be such a feast for the eyes, such a source of inspiration, such a simple way to turn an idea into art? I like to go straight into the DIY section. Here are some of my favorites from today:
How simple and cute is that? Especially with a Cricut...
What a fun idea!
I will definitely be making some of these with my daughters for Christmas this year.
Really, I'm warning you - it's addictive! Check it out!
Sunday, September 18, 2011
Tuesday, September 13, 2011
Backpack tutorial
Here it is folks! The long awaited backpack tutorial. I hope this all makes sense!
OK, to start out with I would suggest choosing a cardstock that is double sided - that way you've 2 fun, coordinating patterns. Half the work is already done for you! The other thing that I am going to suggest is a really good adhesive - I used Glue Dots brand Glue Lines.
The dimensions (all expressed in inches) for each of the pieces are:
(1) 12 x 4 (for the box part of the backpack)
(1) 4 x 6 1/2 (for the flap of the backpack)
(2) 1 x 8 (for the straps)
(2) 5 x 2 1/4 (for the sides)
(1) 1/2 x 3 1/2 (for the little loop/tab on the top)
Score the 12 x 4 piece of cardstock at 5, 6 and 7 inches. The reason for the score at 6 inches is to make a little gusset at the bottom of the backpack:
After you have scored the body of the backpack, you are going to attach the flap. If you are using double sided paper, remember to flip your flap (NOT like the first picture), so that when you fold it over you will see the other side. I suggest overlapping the pieces about 1 1/4 inches, and having two lines of adhesive - one right on the edge, and the other about 1" in:
From there you are going to start assembling your sides. Score your 5 x 2 1/4 pieces lengthwise at 1/4" and 2" so that you have 1/4" flaps on either side. Apply adhesive to the flaps. Note: This is another spot where you need to pay attention to what side of the paper you want facing out.
Apply the sides to the body of the backpack:
You will notice that the flap in the above picture still has a square edge. If you would like a rounded edge, use your favorite tool, or do what I did and just use a bowl and trace the edge and cut with a good, old fashioned pair of scissors! ;-)
I pinched the sides just a little:
From there you are going to apply your straps. At the top of the straps (the part that would normally sit on your shoulders) you are going to run two strips of adhesive - right on the edge, and about 1/4" in. Apply to the back of the backpack about 1/4" from the sides, and about 1/2" from the top. Then apply 1 strip of adhesive on the other side and on the other end of the flap, and adhere along the bottom edge of the backpack.
And then adhere to the back of the backpack between the straps:
From there, embellish as desired!
To keep the flap closed, I used the velcro tabs that already have adhesive on them. Thank you much for your interest in my little backpack. I hope this has helped! If you have any further questions, please feel free to contact me.
OK, to start out with I would suggest choosing a cardstock that is double sided - that way you've 2 fun, coordinating patterns. Half the work is already done for you! The other thing that I am going to suggest is a really good adhesive - I used Glue Dots brand Glue Lines.
The dimensions (all expressed in inches) for each of the pieces are:
(1) 12 x 4 (for the box part of the backpack)
(1) 4 x 6 1/2 (for the flap of the backpack)
(2) 1 x 8 (for the straps)
(2) 5 x 2 1/4 (for the sides)
(1) 1/2 x 3 1/2 (for the little loop/tab on the top)
Score the 12 x 4 piece of cardstock at 5, 6 and 7 inches. The reason for the score at 6 inches is to make a little gusset at the bottom of the backpack:
After you have scored the body of the backpack, you are going to attach the flap. If you are using double sided paper, remember to flip your flap (NOT like the first picture), so that when you fold it over you will see the other side. I suggest overlapping the pieces about 1 1/4 inches, and having two lines of adhesive - one right on the edge, and the other about 1" in:
From there you are going to start assembling your sides. Score your 5 x 2 1/4 pieces lengthwise at 1/4" and 2" so that you have 1/4" flaps on either side. Apply adhesive to the flaps. Note: This is another spot where you need to pay attention to what side of the paper you want facing out.
Apply the sides to the body of the backpack:
You will notice that the flap in the above picture still has a square edge. If you would like a rounded edge, use your favorite tool, or do what I did and just use a bowl and trace the edge and cut with a good, old fashioned pair of scissors! ;-)
I pinched the sides just a little:
From there you are going to apply your straps. At the top of the straps (the part that would normally sit on your shoulders) you are going to run two strips of adhesive - right on the edge, and about 1/4" in. Apply to the back of the backpack about 1/4" from the sides, and about 1/2" from the top. Then apply 1 strip of adhesive on the other side and on the other end of the flap, and adhere along the bottom edge of the backpack.
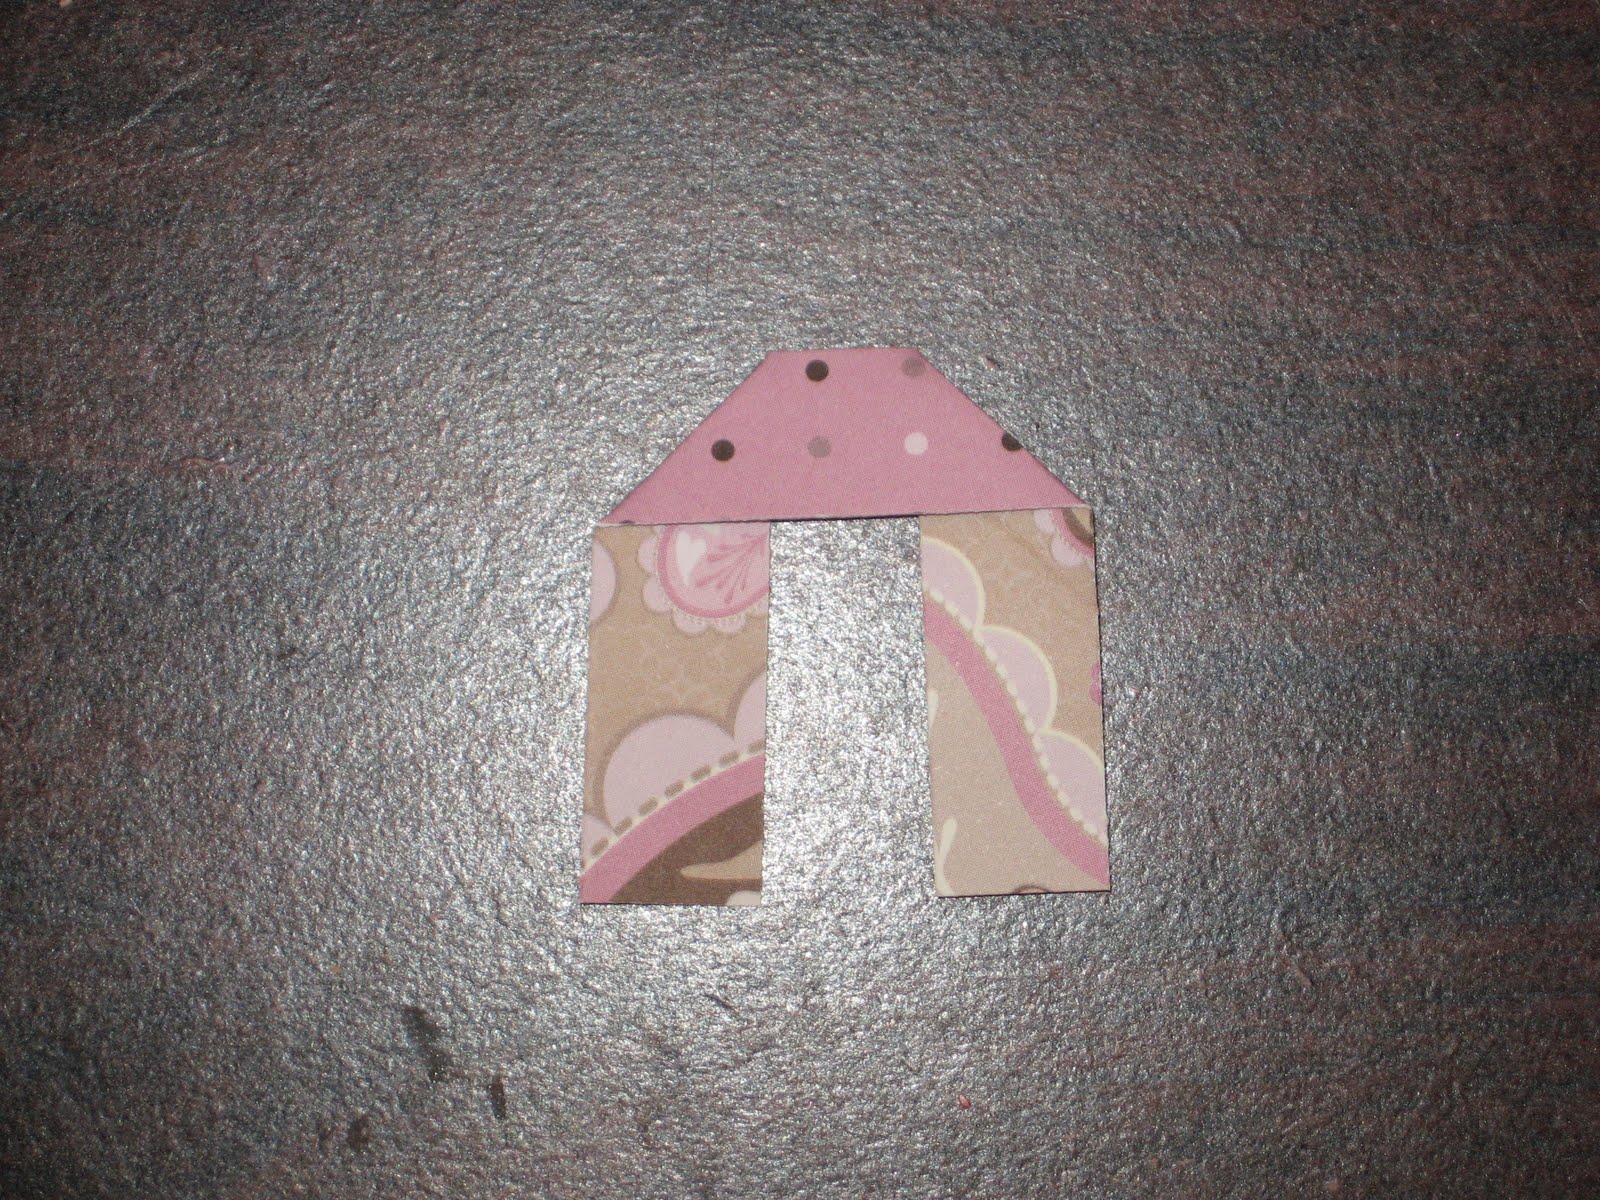
To make the little tabby thingy, you will fold the strip at a right angle about 1" from each end:
And then adhere to the back of the backpack between the straps:
From there, embellish as desired!
To keep the flap closed, I used the velcro tabs that already have adhesive on them. Thank you much for your interest in my little backpack. I hope this has helped! If you have any further questions, please feel free to contact me.
Friday, September 9, 2011
Pinkalicious Blog Hop Friday!
I'm so glad that you have joined me for My Pink Stamper's Pinkalicious Blog Hop Friday! If you arrived here from Michelle at Meesh's Pieces, then you're in the right place. If you arrived here on your own tonight, I invite you to head over to My Pink Stamper so you can start hopping from the beginning and see all the wonderful designer's projects.
Isn't this a wonderful time of year? I just love September because it means cooler weather, harvest time, apples, and of coarse - school! I have one child in middle school, one in elementary school, and my little guy does mommy-school. Homework, carpool, packed lunches, orchestra - wait, why am I excited it's September? LOL!
The theme for this month's hop is the My Pink Stamper set School Days. If you would like to purchase this set or any of Robyn's fabulous stamps, you can find a list of retailers here.
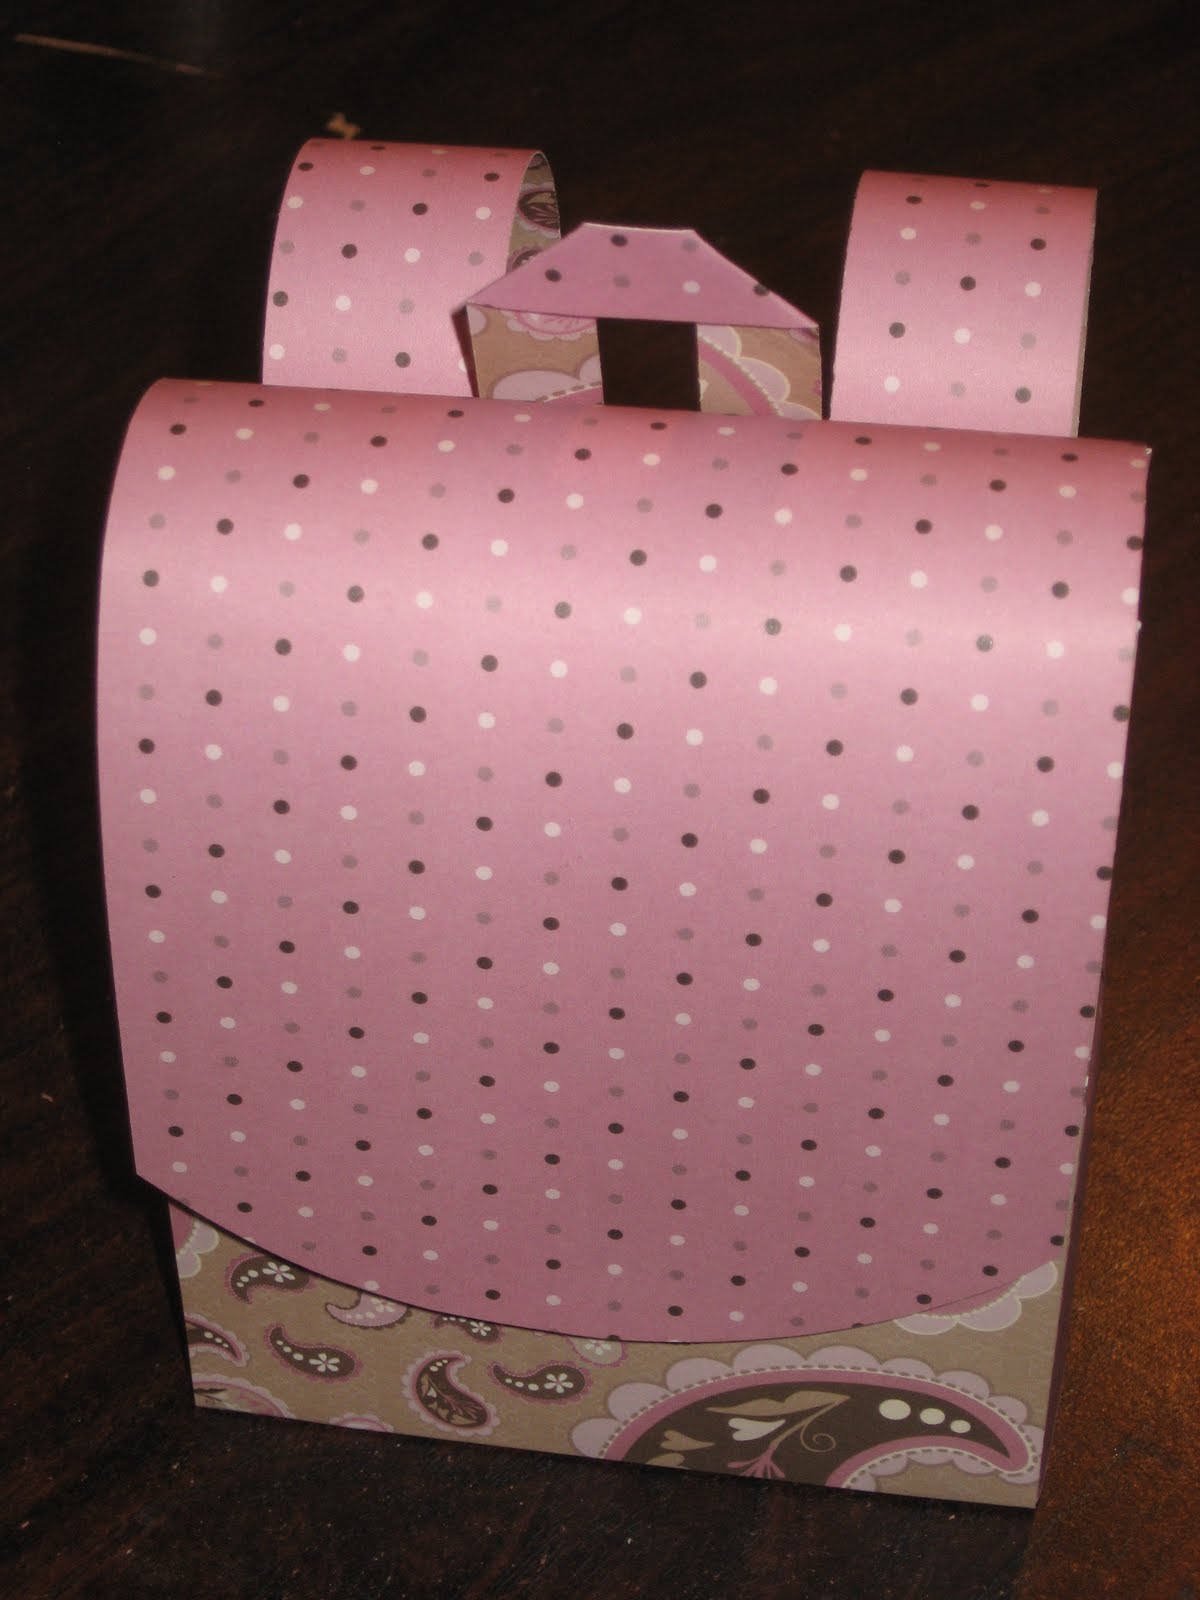
I decided that it is never too earlier to be thinking of fun gift ideas for my children's wonderful teachers. So I designed a backpack! The backpack closure is a little piece of velcro, so it is all set to hold candy, some cookies, mini bottles of lotion or soap - whatever.
Stamp: My Pink Stamper School Days
Cricut Cartridges: Mother's Day Bouquet (flower), Winter Frolic (tag)
Paper: Around the Block (Periwinkle Buttons), Georgia Pacific
Embellishments: white embossing powder, Recollections (pearls), lace
Now it's time for you to hop over to the lovely Karlee at Karlee Krafts . Thanks so much for stopping by! And don't forget to head back to My Pink Stamper to join us for a fun challenge! Here's the complete hop order for you just in case:
Isn't this a wonderful time of year? I just love September because it means cooler weather, harvest time, apples, and of coarse - school! I have one child in middle school, one in elementary school, and my little guy does mommy-school. Homework, carpool, packed lunches, orchestra - wait, why am I excited it's September? LOL!
The theme for this month's hop is the My Pink Stamper set School Days. If you would like to purchase this set or any of Robyn's fabulous stamps, you can find a list of retailers here.
I decided that it is never too earlier to be thinking of fun gift ideas for my children's wonderful teachers. So I designed a backpack! The backpack closure is a little piece of velcro, so it is all set to hold candy, some cookies, mini bottles of lotion or soap - whatever.
Stamp: My Pink Stamper School Days
Cricut Cartridges: Mother's Day Bouquet (flower), Winter Frolic (tag)
Paper: Around the Block (Periwinkle Buttons), Georgia Pacific
Embellishments: white embossing powder, Recollections (pearls), lace
Now it's time for you to hop over to the lovely Karlee at Karlee Krafts . Thanks so much for stopping by! And don't forget to head back to My Pink Stamper to join us for a fun challenge! Here's the complete hop order for you just in case:
Maria
** Update: Thank you for your interest in how to make the backpack! It is so easy - I'll work on getting some detailed instructions up in a few days. **
Wednesday, September 7, 2011
Scrapbook USA Expo!
I just wanted to share with my Utah friends that one of my favorite events is happening this weekend - the Scrapbook USA Expo in Sandy, UT, at the South Towne Expo Center. I have been attending this event twice a year for at least 6 years. What could be better than an enormous room full of tables to scrap/craft at, lots of great food, music & fun, and of coarse - shopping! Honestly, I've never had the time to bring my supplies with me and scrap all day, but I sure have fun with the shopping part! A little too much fun...
They have so many great companies there, and great prices. My favorites are:
And then of coarse Provo Craft will be there demonstrating all their latest machines and products. Do you think I can talk them into giving me an E2? ;-)
I'll be there on Saturday - see you there!
Oh, and don't forget - this Friday is Pinkalicious Blog Hop Friday! So come back to see all the great projects that we designers have made with My Pink Stamper stamps! Hopefully by then I won't be up to my eyeballs in peaches - 'tis the season!
They have so many great companies there, and great prices. My favorites are:
And then of coarse Provo Craft will be there demonstrating all their latest machines and products. Do you think I can talk them into giving me an E2? ;-)
I'll be there on Saturday - see you there!
Oh, and don't forget - this Friday is Pinkalicious Blog Hop Friday! So come back to see all the great projects that we designers have made with My Pink Stamper stamps! Hopefully by then I won't be up to my eyeballs in peaches - 'tis the season!
Thursday, September 1, 2011
Holiday Doodlebuggin'
Well, you may have figured out that the reason I was spending some quality time with my Doodlebug Design Inc products last week was because I was preparing my submission for their first Design Team call. I have loved their products for years, so naturally I would love the opportunity to get other people excited about them too!
So far you have seen my layout, and one of my cards. Today I would like to share with you the rest of my submission. I think one of the best parts of being a crafter is it gives you a reason to get into the holiday mood early! I hope these will help get you in a holiday kind of mood too.
I just love Halloween! This is an 8 inch foam wreath that I wrapped in black tulle. The fence and the spider were made using the Mini Monsters Cricut Cartridge, and the spider web was made using Paper Doll Dress-Up. I have the most adorable Doodlebug Design Halloween Jellishments which is where the round purple embellishment (with the spider & web) and the Halloween came from. I also used the Doodlebug Design Spooky Town Assortment Boutique Brads together with some cute Halloweeny (is that a word?) baker's twine. Finish with some ribbon, and voila!
And last but not least:
So far you have seen my layout, and one of my cards. Today I would like to share with you the rest of my submission. I think one of the best parts of being a crafter is it gives you a reason to get into the holiday mood early! I hope these will help get you in a holiday kind of mood too.
I just love Halloween! This is an 8 inch foam wreath that I wrapped in black tulle. The fence and the spider were made using the Mini Monsters Cricut Cartridge, and the spider web was made using Paper Doll Dress-Up. I have the most adorable Doodlebug Design Halloween Jellishments which is where the round purple embellishment (with the spider & web) and the Halloween came from. I also used the Doodlebug Design Spooky Town Assortment Boutique Brads together with some cute Halloweeny (is that a word?) baker's twine. Finish with some ribbon, and voila!
And last but not least:
I just love how this turned out. It's so simple, but so cheerful! I started with a white card base, and followed with green, and then red cardstock. The Christmas tree in the center is another one of those cute Jellishments from their Christmas assortment. On either side of the tree I just cut and matted circles in white and green, then placed candy canes from the Doodlebug Design Christmas Candy Assortment Boutique brads. I then finished with some Christmasy baker's twine.
If you are a papercrafter then you're probably like me and have been using and loving Doodlebug Design products for years. But if you're not familiar, head over to their website or their blog and check out their fabulous products - you'll be glad you did!
Wednesday, August 31, 2011
More Doodlebuggin'
Here's the next installment in my Doodlebug Design Inc projects. And this is why I love their products so much - they're just so fun! The adorable paper in the background is from their Summertime Collection and is called Little Lady. I took three cuts from their Feeling Groovy Cute Cuts - the pink flower, the tag, and the "smile". Then I took some brads from their Cherries Jubilee Boutique Brads - one is the center of the flower, and the other is the red with the white polka dots.
You might also notice that I have started using baker's twine. Baker's twine is everywhere in the papercrafting world right now, and I have to admit, when I first noticed it I was not sold on it at all. But I have seen too many adorable projects embellished with twine, so I had to get some and give it a try. I wish I could say that this is the Doodlebug Design Doodle Twine, but it was just introduced at CHA in July and isn't readily available yet. Maybe they'll have some at the Scrapbook USA Expo next week! I really like the look it creates.
Paper: Doodlebug Design Inc (Little Lady), Doodlebug Design Cute Cuts (Feeling Groovy), AC Cardstock
Embellishments: Doodlebug Design Inc Boutique Brads (Cherries Jubilee), baker's twine, assorted gems and buttons, Petalloo Flower, Diamond Glaze
You might also notice that I have started using baker's twine. Baker's twine is everywhere in the papercrafting world right now, and I have to admit, when I first noticed it I was not sold on it at all. But I have seen too many adorable projects embellished with twine, so I had to get some and give it a try. I wish I could say that this is the Doodlebug Design Doodle Twine, but it was just introduced at CHA in July and isn't readily available yet. Maybe they'll have some at the Scrapbook USA Expo next week! I really like the look it creates.
Paper: Doodlebug Design Inc (Little Lady), Doodlebug Design Cute Cuts (Feeling Groovy), AC Cardstock
Embellishments: Doodlebug Design Inc Boutique Brads (Cherries Jubilee), baker's twine, assorted gems and buttons, Petalloo Flower, Diamond Glaze
Monday, August 29, 2011
Doodlebuggin'
My absolute favorite papercrafting company is Doodlebug Design Inc. All I have to do is go to the Doodlebug isle at my local craft store, and it just makes me happy! I love their color palette, I love the fun images, their boutique brads, their glitter paper, I love to go to their booth during the Scrapbook USA Expo (which is coming up BTW), I just LOVE them! I love what they did at this summer's CHA. Did you know that they won an award at CHA for their super fun booth? How could they not? Their wonderful new products and creative exhibiting just screamed fun!
Last week I spent some quality time with my Doodlebug Design Inc products, and this week I am going to share them with you!
I made this layout using primarily their Welcome Home collection. Aren't those just the cutest kids you've ever seen? I don't know whose they are - I just found them on the street and dragged them in for a picture! ;-)
Paper: Doodlebug Design, AC Cardstock, DCWV
Accessories: Doodlebug Design Cute Cuts (Welcome Home), Doodlebug Design Boutique Brads (Welcome Home), American Crafts (ribbon), DCWV (buttons), Prima (flowers), Diamond Glaze
Last week I spent some quality time with my Doodlebug Design Inc products, and this week I am going to share them with you!
I made this layout using primarily their Welcome Home collection. Aren't those just the cutest kids you've ever seen? I don't know whose they are - I just found them on the street and dragged them in for a picture! ;-)
Paper: Doodlebug Design, AC Cardstock, DCWV
Accessories: Doodlebug Design Cute Cuts (Welcome Home), Doodlebug Design Boutique Brads (Welcome Home), American Crafts (ribbon), DCWV (buttons), Prima (flowers), Diamond Glaze
Subscribe to:
Posts (Atom)