Showing posts with label bags and boxes. Show all posts

Tuesday, June 26, 2012

My Pink Stamper Design Team - June

Welcome!  Today is the day that me and my fellow designers at My Pink Stamper showcase our projects, and the theme for this month is the new stamp set Yankee-Doodles!  In case you missed it, this set was just released last Friday.


I have been having so much fun with this set!  I just love these images, and I love this time of year.  I decided to start my celebrations early by trying a new Cricut cartridge.  I've had the Tags, Bags, Boxes & More 2 cartridge for a few months now, but I haven't been able to use it because it took me FOREVER to find one of the scoring tips locally.  Not to mention, there was an update for the Gypsy, and an update for my Expression...

If you purchase this cartridge, my best advice to you is this - turn off the Material Saver function.  Remember this one detail, and learning this new cartridge will be a much happier experience for you!  Other than that, be prepared to use up some plain white cardstock (or whatever other color you have in abundance) while you play around with the cutting and scoring features.  After trial and error, here is my project:


This is the "cracker" box that is found on the Tags, Bags, Boxes & More 2 cartridge.  I know that I'll be using this one at Christmastime, but why not now?  I thought the firecracker stamp was the perfect image to accompany a great little gift for a friend or neighbor, or maybe a party favor at an Independence Day celebration.  I cut this box using the "Fit to Page" function on the Cricut, which on my Expression happened to be 8.8 inches.  Now it's all ready to fill with salt water taffy, or maybe a couple of packages of snaps and some glow sticks.

Stamps:  My Pink Stamper Yankee Doodles
Cricut Cartridges:  Tags, Bags, Boxes & More 2, Plantin Schoolbook (ovals)
Paper:  AC Cardstock, DCWV (gingham)
Embellishments:  Copic markers, baker's twine (Doodlebug Design), Stickles

Thanks for stopping by!  If you haven't already, be sure to head over to My Pink Stamper so you can see all the wonderful projects made by my fellow designers.

Friday, March 9, 2012

Pinkalicious Blog Hop Friday!

Hello all!  I'm so glad that you have joined me for Pinkalicious Blog Hop Friday!  If you have arrived here from Angela's blog, then you're in the right place.  If you arrived here on your own tonight, I invite you to hop over to My Pink Stamper so you can start at the beginning and see all the wonderful projects in tonight's hop.

The theme for this month's project is St. Patrick's Day!  All ye fellow Irishmen, show your green!  My maiden name originates in County Cork in Ireland.  So I have to go back about 5-6 generations, but there's Irish in me!  And what a great way, and a great time to celebrate the color green.  We've been starting to see and feel the first signs of spring here.  I decided to celebrate by buying two pear trees and some potting soil!  So hopefully there will be lots of green in my future, and not brown...  ;-)

For my project today I chose to use the My Pink Stamper set called Happiest Moments:


And here is what I made:


I thought for this month's project I would make a little treatie for my kids.  They don't know yet though, so ssshhhhhh!  ;-)  I got some chocolate coins, some candy sticks from our local candy factory, some cute cuts from the Simply Charmed Cricut cartridge, and the perfect stamp to top it all off!  And don't you just love cellophane?  I think just about anything looks beautiful when it's wrapped in cellophane.  ;-)

Stamp:  My Pink Stamper Happiest Moments
Cricut Cartridge:  Simply Charmed - I used the leprechaun and the pot of gold
Paper:  AC Cardstock, Roberts Crafts
Ribbon:  Joann
Embellishment:  Stickles

Thanks for stopping by!  You next stop on the hop is Alex at You Had Me At Craft.  Don't forget to stop by My Pink Stamper when you're through and join us in this month's theme.  I have also included the entire blog hop order below.  Happy Hopping!

Tuesday, September 13, 2011

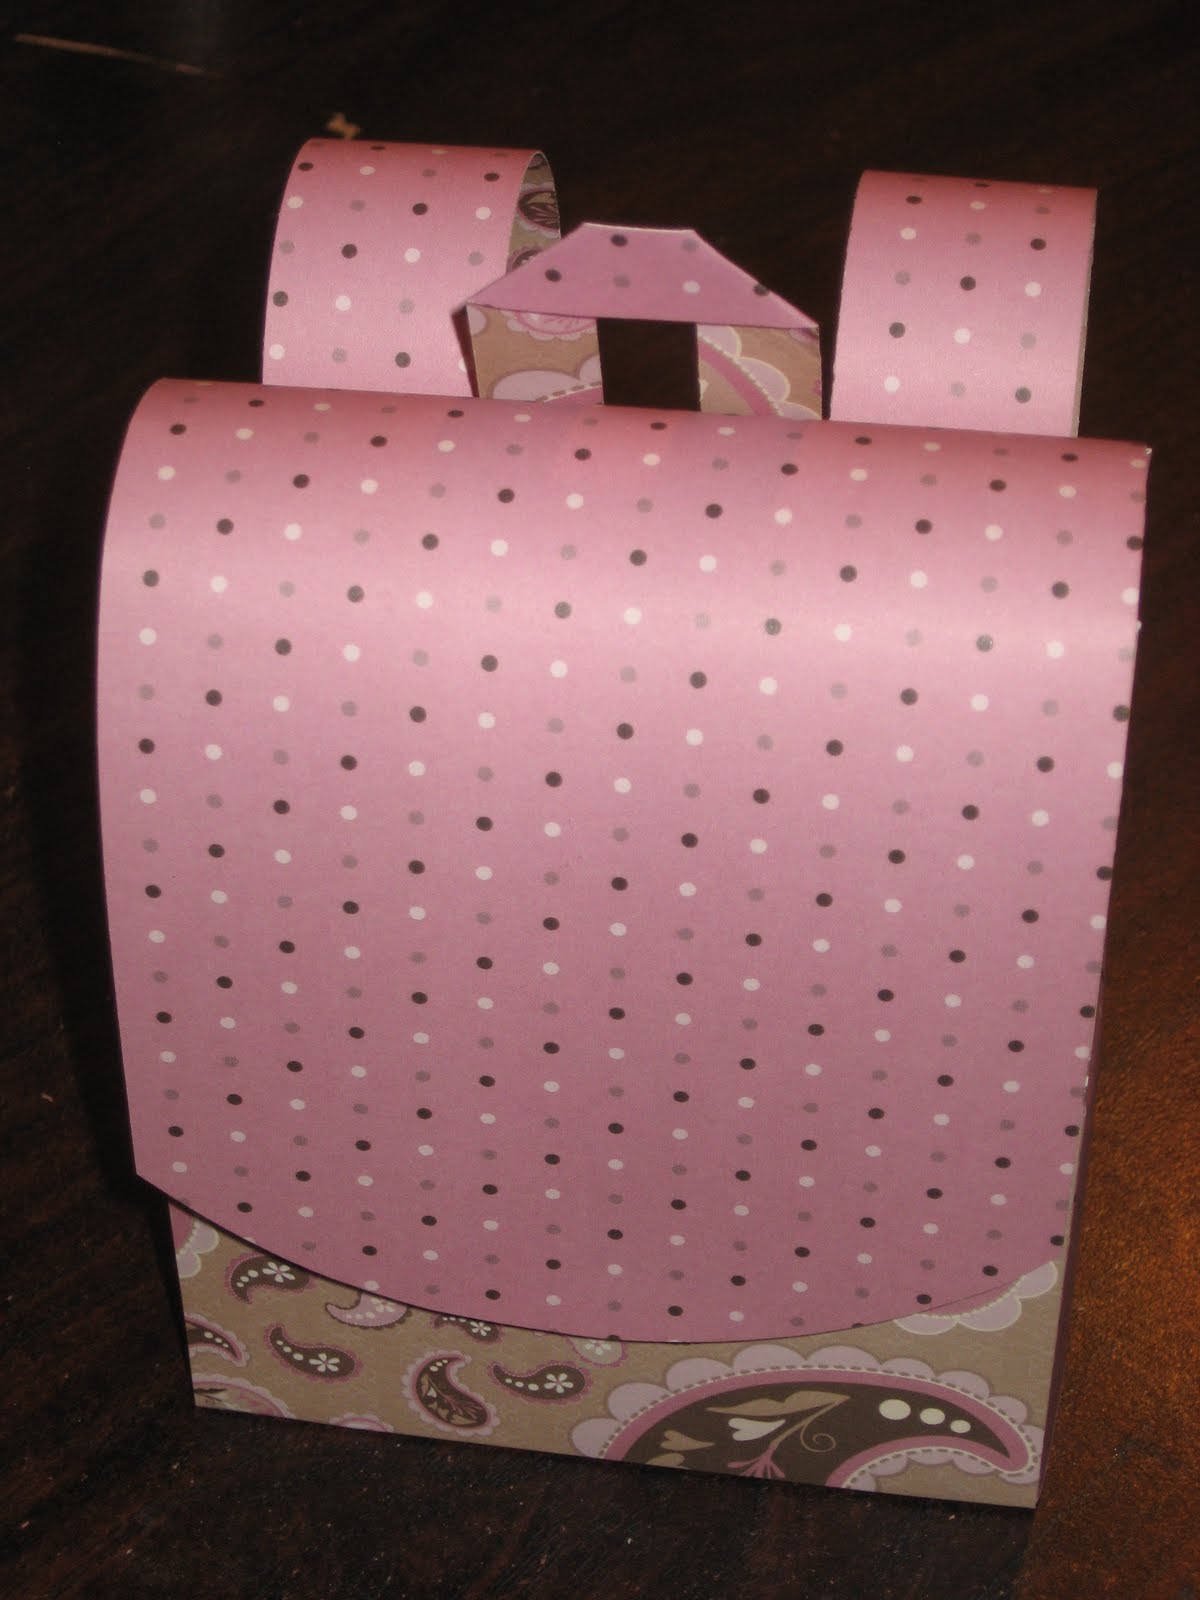
Backpack tutorial

Here it is folks!  The long awaited backpack tutorial.  I hope this all makes sense!


OK, to start out with I would suggest choosing a cardstock that is double sided - that way you've 2 fun, coordinating patterns.  Half the work is already done for you!  The other thing that I am going to suggest is a really good adhesive - I used Glue Dots brand Glue Lines.

The dimensions (all expressed in inches) for each of the pieces are:
(1) 12 x 4 (for the box part of the backpack)
(1) 4 x 6 1/2 (for the flap of the backpack)
(2) 1 x 8 (for the straps)
(2) 5 x 2 1/4 (for the sides)
(1) 1/2 x 3 1/2 (for the little loop/tab on the top)


Score the 12 x 4 piece of cardstock at 5, 6 and 7 inches.  The reason for the score at 6 inches is to make a little gusset at the bottom of the backpack:


After you have scored the body of the backpack, you are going to attach the flap.  If you are using double sided paper, remember to flip your flap (NOT like the first picture), so that when you fold it over you will see the other side.  I suggest overlapping the pieces about 1 1/4 inches, and having two lines of adhesive - one right on the edge, and the other about 1" in:


From there you are going to start assembling your sides.  Score your 5 x 2 1/4 pieces lengthwise at 1/4" and 2" so that you have 1/4" flaps on either side.  Apply adhesive to the flaps.  Note:  This is another spot where you need to pay attention to what side of the paper you want facing out.


Apply the sides to the body of the backpack:


You will notice that the flap in the above picture still has a square edge.  If you would like a rounded edge, use your favorite tool, or do what I did and just use a bowl and trace the edge and cut with a good, old fashioned pair of scissors!  ;-)

I pinched the sides just a little:


From there you are going to apply your straps.  At the top of the straps (the part that would normally sit on your shoulders) you are going to run two strips of adhesive - right on the edge, and about 1/4" in.  Apply to the back of the backpack about 1/4" from the sides, and about 1/2" from the top.  Then apply 1 strip of adhesive on the other side and on the other end of the flap, and adhere along the bottom edge of the backpack.

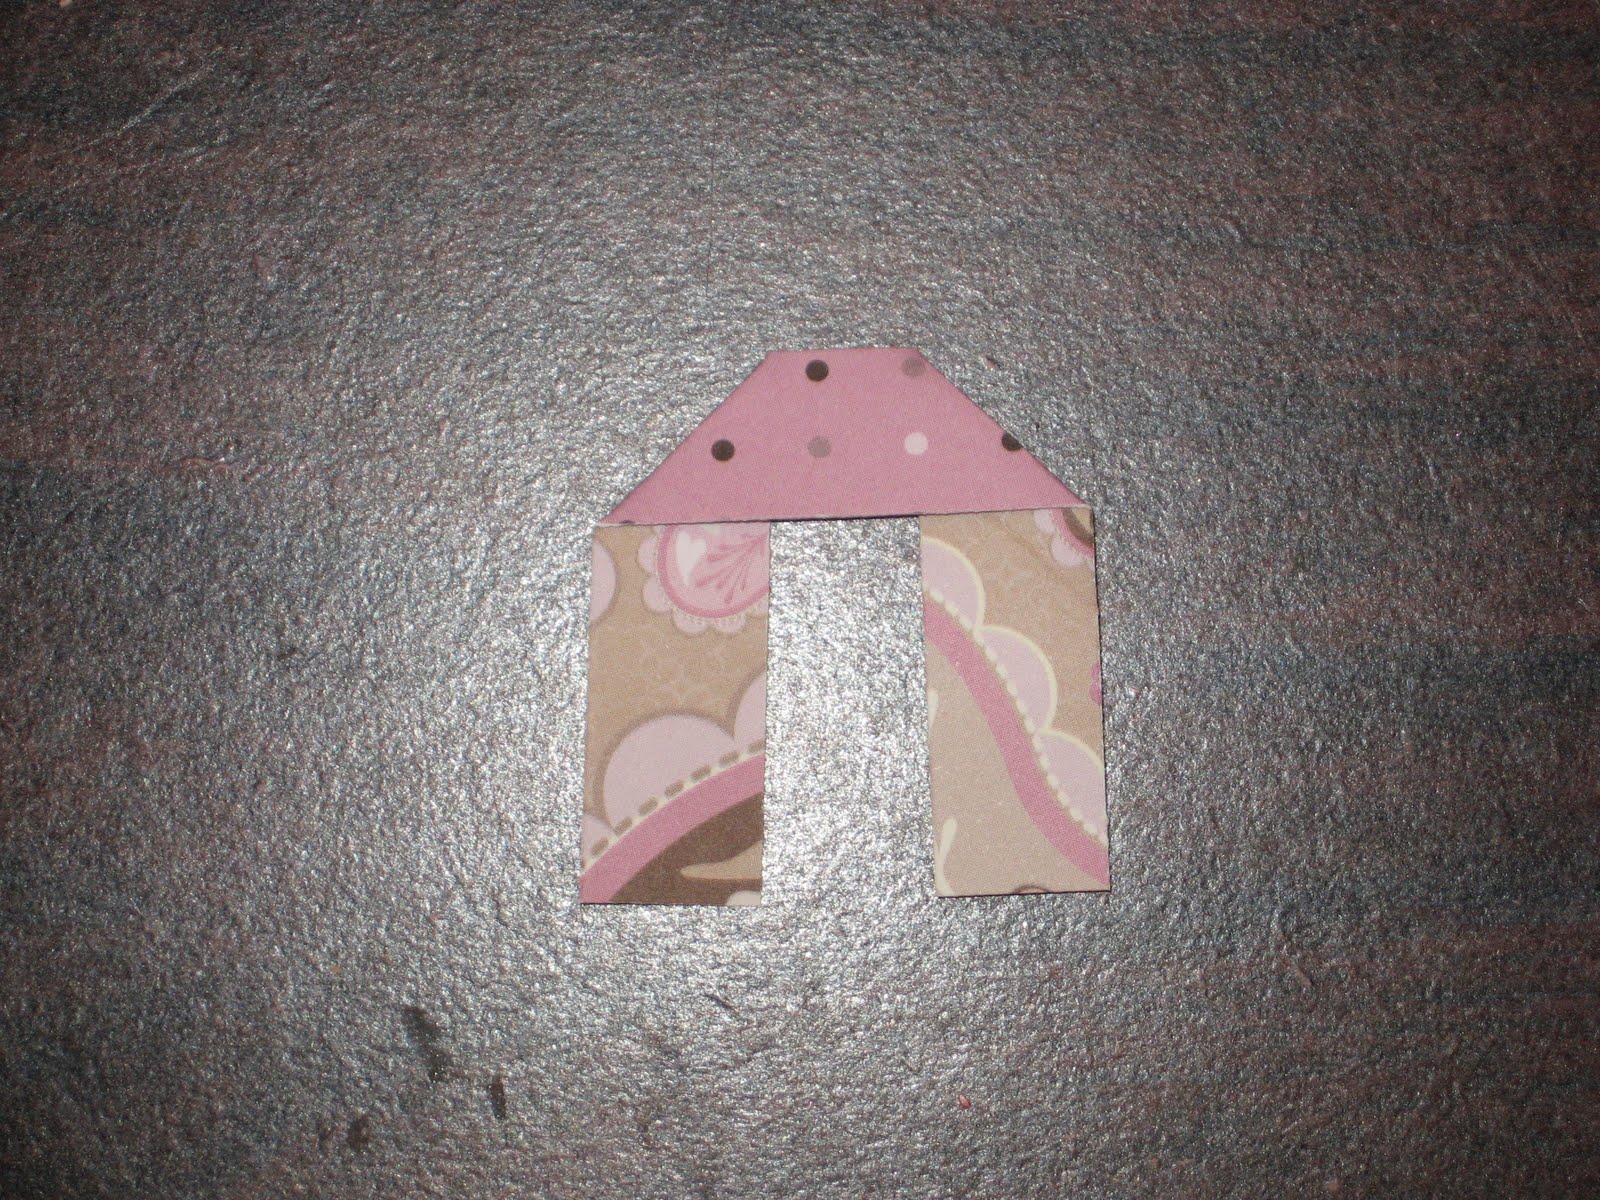
To make the little tabby thingy, you will fold the strip at a right angle about 1" from each end:


And then adhere to the back of the backpack between the straps:


From there, embellish as desired!


To keep the flap closed, I used the velcro tabs that already have adhesive on them.  Thank you much for your interest in my little backpack.  I hope this has helped!  If you have any further questions, please feel free to contact me.

Friday, September 9, 2011

Pinkalicious Blog Hop Friday!

I'm so glad that you have joined me for My Pink Stamper's Pinkalicious Blog Hop Friday!    If you arrived here from Michelle at Meesh's Pieces, then you're in the right place.  If you arrived here on your own tonight, I invite you to head over to My Pink Stamper so you can start hopping from the beginning and see all the wonderful designer's projects.

Isn't this a wonderful time of year?  I just love September because it means cooler weather, harvest time, apples, and of coarse - school!  I have one child in middle school, one in elementary school, and my little guy does mommy-school.  Homework, carpool, packed lunches, orchestra - wait, why am I excited it's September?  LOL!

The theme for this month's hop is the My Pink Stamper set School Days.  If you would like to purchase this set or any of Robyn's fabulous stamps, you can find a list of retailers here.


I decided that it is never too earlier to be thinking of fun gift ideas for my children's wonderful teachers.  So I designed a backpack!  The backpack closure is a little piece of velcro, so it is all set to hold candy, some cookies, mini bottles of lotion or soap - whatever.


Stamp:  My Pink Stamper School Days
Cricut Cartridges:  Mother's Day Bouquet (flower), Winter Frolic (tag)
Paper:  Around the Block (Periwinkle Buttons), Georgia Pacific
Embellishments:  white embossing powder, Recollections (pearls), lace

Now it's time for you to hop over to the lovely Karlee at Karlee Krafts .  Thanks so much for stopping by!  And don't forget to head back to My Pink Stamper to join us for a fun challenge!  Here's the complete hop order for you just in case:


Maria

**  Update:  Thank you for your interest in how to make the backpack!  It is so easy - I'll work on getting some detailed instructions up in a few days.  **

Wednesday, July 13, 2011

Box Social

Have you ever been to an old fashioned Box Social?  Well, I don't know how old fashioned the one that I went to was, but it sure was fun.  I joined with other ladies from church at a local park with my decorated box filled with yummy food, and then we played the game where you could choose a box, or steal from someone else.  And guess who won the prize for the cutest box?  Me!  Although honestly, the best prize was that my mom who is visiting from Canada right now was able to come with me.


I had so much fun with this!  Very girl power, eh?  I used an 8x8 paper mache box and trimmed with cardstock, but my favorite part is definitely the shoe and purse on top.  The shoe is Ellen Hutson's design, and the purse came from the cartridge Bags, Tags, Boxes and More.  I filled it with a chicken salad sandwich on homemade bread, cucumbers and carrots, a homemade banana oatmeal muffin, Perrier, chocolate covered strawberries, and some peppermint bark.  Yum - I wanted to have my box!  It was a great way to spend a gorgeous summer evening.

Cricut Cartridge:  Tags, Bags, Boxes & More
Paper:  The Paper Studio, AC Cardstock
Edge Punch:  Martha Stewart
Embellishments:  Michaels (ribbon), The Paper Studio (flower), Recollections (pearls), Stampin Up (clear button), Darice (gems)

Wednesday, April 20, 2011

FCCB Bunny Hop Challenge!

I did a little experiment, and low and behold, it turned into a challenge - a bunny hop challenge to be exact.  I wanted to try making a carrot shaped box to put some Easter treats in.  I used the tree box from the Tags, Bags, Boxes & More cartridge, cut some green grass with Plantin Schoolbook for the leaves, put a bunny on it and there you have it.  Very simple, but very cute.  Well, I think so anyway!  ;-)  And of coarse Robyn at My Pink Stamper has a perfect stamp to go along!


Cricut Cartridges:  Tags Bags Boxes & More, Create a Critter, Plantin Schoolbook
Stamps:  My Pink Stamper Even More Punnylicious
Paper:  AC Cardstock, Roberts Crafts, Bazzill
Embossing:  Cuttlebug Swiss Dots

Tuesday, March 15, 2011

Piece of cake!

I made this a month or so ago for a contest that I entered, and I can finally show it to you because I didn't win.  Waaahhh!!!

Seriously though, I loved making this cake!  This is probably the most satisfying project I have ever made.  It sat on my kitchen counter on a cake stand for weeks!  I almost shed a tear as I glued it all together because it is going to be on display at my local Joann for an upcoming class.

For those of you who haven't seen these before, the cake is made using the triangle box from the Tags, Bags, Boxes & More cartridge.  Put a bunch of triangles together, and what do you get?  A cake!  The very top layer was made from an embellished paper mache box.  Some of the rosettes were made from an Imaginisce Roly Rosies pack, but then I figured out how to do them freehand - even better! 

The best part of this project is you can actually use the pieces of the cake to hold party favors.  What little girl wouldn't love this at their party, and then be able to take a little piece of "cake" home with them?


Cricut Cartridge:  Tags, Bags, Boxes & More, Gypsy
Paper:  DCWV, Doodlebug Design, AC Cardstock
Paper Punch:  Martha Stewart Scallop Dot
Embellishments:  Offray ribbon, Imaginisce Roly Rosies

Sunday, March 6, 2011

Something with "purse"onality

The challenge this past week at The Cuttlebug Spot was called, "Ouch!  Pins...pins...pins."  The challenge was to make a project using, you guessed it, pins.  So here's a very simple little something that I made that I think turned out pretty cute!


I have two very girly girls at home that absolutely loved this.  I think I can see some birthday party favors in my future!

Cricut Cartridge:  Forever Young (purse), A Walk In My Garden (flower)
Embossing:  Cuttlebug Swiss Dots
Paper:  AC Cardstock, Stampin Up
Embellishments:  corsage pins, DCWV (button), American Crafts (ribbon)

Wednesday, February 9, 2011

A little Toy Story love...

Here's a little something that I made for my son's preschool class for their Valentine's party.  No, I'm not completely insane - there are only four of them in the class!  This is a pretty simple concept, but there's A LOT of layering with this Toy Story cartridge.  I think it was worth it though - doesn't it just look like the alien is trying to give you a hug?  I knew there would be a perfect My Pink Stamper stamp to go along with this - Hugs to You, from the Everyday Life set.


4 x 6 cellophane bags
Cricut Cartridge:  George & Basic Shapes,  Toy Story
Stamps:  My Pink Stamper Everyday Life
Paper:  AC Cardstock, Stampin Up, Georgia Pacific
Embellishments:  Crystal Effects, Studio G glitter glue

Monday, February 7, 2011

FCCB Cricut Crawl - Share the Love!

Welcome to Divine Domesticity and the fourth Fantabulous Cricut Crawl ... Fantabulous Cricut's version of a blog hop!

Valentine's Day is in a week and everyone at Fantabulous Cricut has decided to Share the Love!   Each Design Team member will be featuring an original Valentine-themed project that includes the word LOVE somewhere on it.

If you came here from the Fantabulous Cricut Challenge Blog, then you're in the right place because I'm the first stop on the crawl.  If you just happened to stop by today, you're still in the right place if you would love to be inspired for your Valentine's Day projects.

Valentine's Day is one of my favorite holidays for a number of reasons:  red is my favorite color, it's my son's birthday, and I love sugar!


And isn't this some of the cutest sugar you've ever seen?  I would venture to guess that many of you have seen lollipops like this because they're everywhere - I've seen them in New York City at Dylan's Candy Bar, I've seen them at Michaels in Indiana, and many touristy areas.  Do you know where they are made?  In my town, by a little company called Kencraft.  They make the most adorable candies decorated with sugar art.  I can even give you a little insider information:  this past week they have been filming an episode of Kid in a Candy Story, a great Food Network show.  Watch for it around Easter!

Cricut Cartridges:  Tags Bags Boxes & More, George & Basic Shapes, Simply Sweet
Paper:  Doodlebug Design (glitter paper), AC Cardstock, Georgia Pacific
Embellishments:  Doodlebug Design (heart brad), Michaels (ribbon), and don't forget the Hershey's Kisses!

I used my glue gun to glue a foam ball (from the floral dept) in the bottom of the box, stuck the lollipop in the foam, and voila! 

Now it's your turn! Let's see your Share the Love projects!  Make sure to include a Cricut cut somewhere on your project and the word Love!

Next stop...Angela's blog, Simple Creations Papercrafts. Go see what she has in store for you today... And when you're done, make sure to link up your project to FCCB's Fantabulous Cricut Crawl post to be entered into the contest!

Friday, February 4, 2011

PKS Monochromatic Challenge

There is a great sketch and challenge going on right now at Peachy Keen Stamps.  The challenge is to make a card that is monochromatic, with black and white allowed.  One of my nieces is having a birthday this weekend, and I had this planned out for her and then realized how beautifully it fit with the challenge.  And it gave me another excuse to play with my My Pink Stamper stamps.  I love all of Robyn's punnies!


Cricut Cartridge:  Create a Critter
Stamps:  My Pink Stamper Even More Punny-licious (Yappy Birthday and paw print)
Paper:  Roberts (black), Doodlebug Design (glitter paper), CTMH (stripes), Stampin Up (violet), Georgia Pacific (white)
Embossing:  Cuttlebug Swiss Dots and Lifestyle Crafts Polka Dots
Decorative Edges:  Coluzzle, Martha Stewart Scallop Dot
Embellishments:  Darice (gems), Michaels (ribbon), Crystal Effects

Friday, January 14, 2011

My Pink Stamper Blog Hop

I am SO excited to be posting for the first time in my role as Pink Designer for My Pink Stamper's first ever BLOG HOP!  Let me start off by telling you a little about myself.  I am a thirty-something (for a little longer) SAHM with 3 children.  My home is now in Utah, but I am originally from the Toronto area in Ontario, Canada (yay Canada!).  I have always liked to work with my hands whether it be crafting, sewing, cooking, or veggie gardening, and had the very best of examples in my very talented and artistic mother.  My love of papercrafting began almost 20 years ago when I got my very first rubber stamps.  I was a demonstrator for a rubber stamp company for 7 years, but didn't get my Cricut until Christmas 2009.  Since then, my creative world has exploded!  It has brought my joy for the art of papercrafting, and my paper fetish, to a whole new level!

The theme for this month's Blog Hop is...

Ha!  You thought I was going to tell you, didn't you?  If you came here from Shauna's blog, then you will find what you need at the bottom of my post.  If you happened upon my blog on your own today, I invite you to go to My Pink Stamper and start from the beginning!  So mysterious...   ;-)

I found these pails at Joann after teaching my class on Tuesday.  They are so cute and very inexpensive and come in some really cute spring colors, plus white.  I filled it up with chocolate hearts, and voila!  I love, love, love, this paper from DCWV.  It's the perfect combination - pink, paisley, flowers, and glitter!  A definite must when you have daughters.


Cricut cartridge:  Forever Young, flower 6 - I curled the petals a little to make the flower stand out
Paper:  DCWV, Paper Pizazz, AC Cardstock
Punch:  Martha Stewart Scallop Dot
Ribbon:  Michaels
Various gems

Here's what you need to carry on with the hop:

Key Word:  SOMETHING
Your next stop:  Raechel at Raechel's Cards

Have fun, and thanks for hopping by!

UPDATE:  For those of you inquiring about the DCWV cardstock, it is called Sweet Berry Pink Glitter.  I found this on clearance somewhere last year, so good luck!  I hope you find some and when you do, let me know!  ;-)

Wednesday, January 5, 2011

A fun new tool

I wish I could say that I was having fun with my new Gypsy, but alas, it has been a bit of a headache.  Although I must admit, it is not poor Gypsy's (or Provo Craft's) fault.  Apparently I have software on my computer that interferes with downloading the Gypsy updates.  I finally resorted to asking a kind friend if I could use her laptop to install my updates, and voila!  We're up and running.  Hopefully I will be able to have some Gypsy posts soon.

The fun new tool that I discovered is the Imaginisce Petal Roller.  Who knew such a simple little object could create such beauty!  I first discovered this while perusing the Roberts Crafts blog where they had the most gorgeous paper flower wreath project that was made using the Petal Roller.  Basically, it is a quilling tool on one end with a stylus on the other.  You can see a video tutorial on how to use the tool here.

Today, in between conversations with Provo Craft's tech support, I decided I needed to try and let go of the frustration and regain some of my crafting mojo so I picked up my petal roller and started, well, rolling.  After I had my three rosettes I knew I had to decorate a cute little box with them.  Can I just say, I love my Expression!  It's so nice being able to use that "fit to page" function and create a decent sized box!  With the right tools creating is, well, a piece of cake!


Cricut Cartridge:  Tags, Bags, Boxes & More, Walk in My Garden (leaves)
Paper:  DCWV, Imaginisce, AC Cardstock
Tool:  Imaginisce Paper Roller
Ribbon:  Offray
Bling:  Stickles

Friday, December 24, 2010

Merry Christmas to all!

I have been busy for the past three days playing Betty Crocker!  I love to bake and make candy and that is one of my favorite things about this time of year.  This year I made:  peanut brittle, english toffee, chewy molasses spice cookies, shortbread, butterscotch confetti, noodle stacks, macaroons, yum yums, and caramels.  Phew!  Thankfully my daughters were a really big help to me this year.  Usually by the time I am done with all the baking I couldn't care less about how they're packaged up, but my Cricut came to the rescue!  It's just so easy to make something cute, so how could I resist?  I did the cutting, my daughter did the assembling and voila!


Cricut Cartridge:  Wild Card
Paper:  American Crafts MerryMint
Ribbon:  American Crafts

Merry Christmas!

Thursday, October 21, 2010

Kids Crafts!

Twice a month I have a group of 8-9 year old girls over for an activity and I thought we would decorate trick-or-treating bags this time.  So I went to my local Xpedx and found some great plain, but sturdy, plastic bags.  I would have liked to have done all the decorating with vinyl, but that would have been a little too complicated for the girls.  So we decorated with paper, vinyl, and permanent markers.  The girls had fun, and I think they turned out pretty well.  I used my Mini Monsters cartridge for the large spiders, pumpkins, and cauldrons.  The little spiders, bats, and "boo" came from the Wild Card cartridge - those were done in vinyl.


Related Posts Plugin for WordPress, Blogger...