Have you ever been to an old fashioned Box Social? Well, I don't know how old fashioned the one that I went to was, but it sure was fun. I joined with other ladies from church at a local park with my decorated box filled with yummy food, and then we played the game where you could choose a box, or steal from someone else. And guess who won the prize for the cutest box? Me! Although honestly, the best prize was that my mom who is visiting from Canada right now was able to come with me.
I had so much fun with this! Very girl power, eh? I used an 8x8 paper mache box and trimmed with cardstock, but my favorite part is definitely the shoe and purse on top. The shoe is Ellen Hutson's design, and the purse came from the cartridge Bags, Tags, Boxes and More. I filled it with a chicken salad sandwich on homemade bread, cucumbers and carrots, a homemade banana oatmeal muffin, Perrier, chocolate covered strawberries, and some peppermint bark. Yum - I wanted to have my box! It was a great way to spend a gorgeous summer evening.
Cricut Cartridge: Tags, Bags, Boxes & More
Paper: The Paper Studio, AC Cardstock
Edge Punch: Martha Stewart
Embellishments: Michaels (ribbon), The Paper Studio (flower), Recollections (pearls), Stampin Up (clear button), Darice (gems)
Showing posts with label Tags Bags Boxes and More. Show all posts
Wednesday, July 13, 2011
Wednesday, April 20, 2011
FCCB Bunny Hop Challenge!
I did a little experiment, and low and behold, it turned into a challenge - a bunny hop challenge to be exact. I wanted to try making a carrot shaped box to put some Easter treats in. I used the tree box from the Tags, Bags, Boxes & More cartridge, cut some green grass with Plantin Schoolbook for the leaves, put a bunny on it and there you have it. Very simple, but very cute. Well, I think so anyway! ;-) And of coarse Robyn at My Pink Stamper has a perfect stamp to go along!
Cricut Cartridges: Tags Bags Boxes & More, Create a Critter, Plantin Schoolbook
Stamps: My Pink Stamper Even More Punnylicious
Paper: AC Cardstock, Roberts Crafts, Bazzill
Embossing: Cuttlebug Swiss Dots
Cricut Cartridges: Tags Bags Boxes & More, Create a Critter, Plantin Schoolbook
Stamps: My Pink Stamper Even More Punnylicious
Paper: AC Cardstock, Roberts Crafts, Bazzill
Embossing: Cuttlebug Swiss Dots
Tuesday, April 19, 2011
My Pink Design Team - April! **Giveaway**
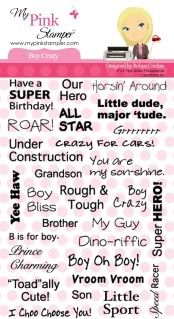
It's always a party at My Pink Stamper - isn't Robyn just so fun? Well the celebration continues as today, me and my fellow designers feature party favors! With my little guy I just know that I have a Toy Story themed party in my future, so I thought it would be fun to use the Toy Story cartridge to create my party favor. And wouldn't you know, Robyn has the perfect set of stamps to go along with it! Today I am featuring My Pink Stamper's Boy Crazy:
This is such a fabulous set! And it's great for boys of all ages too. I know I'll be using this one a ton. If you would like to see where you can purchase some of these for yourself you can click here.
These party favors are just so easy to make too. I used my Gypsy to make this box from Tags, Bags, Boxes & More because the Gypsy would let me make the box a little bigger than I could with the Expression alone - at 7 inches. Then I used the Toy Story cartridge to cut the sheriff badge in the background. Once again enter Gypsy so I could just cut the basic star shape without the cuts on the interior of the star. And then of coarse, Woody! Put it all together, add some cute paper shred and some candy and there you have it! What little boy wouldn't love this? What little boy wouldn't tear this to pieces in 3 seconds? I try not to think about that part... ;-)
**Update** For those who have asked about the difficulty of this project - There isn't anything terribly difficult about this technique-wise. The boxes are easy to assemble and decorate. The time consuming part is the Woody cut, as anyone who has the Toy Story cartridge can tell you. This isn't like Create a Critter where the layering is really easy. With Toy Story there are a lot of little parts to piece together. This is why I went with this particular cut - Woody's head doesn't have quite as many little details to add. But in the end, it doesn't really matter how long it takes if you're enjoying doing it!
Cricut Cartridges: Toy Story, Tags Bags Boxes & More, Gypsy
Stamps: My Pink Stamper Boy Crazy
Paper: AC Cardstock, Bazzill
Ink: Stampin' Up!
Accessories: Offray (ribbon), watercolor pencils (Stampin' Up!), hemp twine
**Giveaway **
And since we're talking about celebrating birthdays, guess who's birthday it is this week? Mine! But the presents are for you because I am having my very first giveaway:
I bet you didn't know when I advertised the DCWV warehouse last week that I was planning on going shopping for you too! I'm giving away a 4.5 x 6.5 Spring mat stack and some coordinating brads. All you have to do is leave a comment and tell me what your favorite way to celebrate your birthday is. Then come back on Friday to see if you've won.
This is such a fabulous set! And it's great for boys of all ages too. I know I'll be using this one a ton. If you would like to see where you can purchase some of these for yourself you can click here.
These party favors are just so easy to make too. I used my Gypsy to make this box from Tags, Bags, Boxes & More because the Gypsy would let me make the box a little bigger than I could with the Expression alone - at 7 inches. Then I used the Toy Story cartridge to cut the sheriff badge in the background. Once again enter Gypsy so I could just cut the basic star shape without the cuts on the interior of the star. And then of coarse, Woody! Put it all together, add some cute paper shred and some candy and there you have it! What little boy wouldn't love this? What little boy wouldn't tear this to pieces in 3 seconds? I try not to think about that part... ;-)
**Update** For those who have asked about the difficulty of this project - There isn't anything terribly difficult about this technique-wise. The boxes are easy to assemble and decorate. The time consuming part is the Woody cut, as anyone who has the Toy Story cartridge can tell you. This isn't like Create a Critter where the layering is really easy. With Toy Story there are a lot of little parts to piece together. This is why I went with this particular cut - Woody's head doesn't have quite as many little details to add. But in the end, it doesn't really matter how long it takes if you're enjoying doing it!
Cricut Cartridges: Toy Story, Tags Bags Boxes & More, Gypsy
Stamps: My Pink Stamper Boy Crazy
Paper: AC Cardstock, Bazzill
Ink: Stampin' Up!
Accessories: Offray (ribbon), watercolor pencils (Stampin' Up!), hemp twine
**Giveaway **
And since we're talking about celebrating birthdays, guess who's birthday it is this week? Mine! But the presents are for you because I am having my very first giveaway:
I bet you didn't know when I advertised the DCWV warehouse last week that I was planning on going shopping for you too! I'm giving away a 4.5 x 6.5 Spring mat stack and some coordinating brads. All you have to do is leave a comment and tell me what your favorite way to celebrate your birthday is. Then come back on Friday to see if you've won.
Tuesday, March 15, 2011
Piece of cake!
I made this a month or so ago for a contest that I entered, and I can finally show it to you because I didn't win. Waaahhh!!!
Seriously though, I loved making this cake! This is probably the most satisfying project I have ever made. It sat on my kitchen counter on a cake stand for weeks! I almost shed a tear as I glued it all together because it is going to be on display at my local Joann for an upcoming class.
For those of you who haven't seen these before, the cake is made using the triangle box from the Tags, Bags, Boxes & More cartridge. Put a bunch of triangles together, and what do you get? A cake! The very top layer was made from an embellished paper mache box. Some of the rosettes were made from an Imaginisce Roly Rosies pack, but then I figured out how to do them freehand - even better!
The best part of this project is you can actually use the pieces of the cake to hold party favors. What little girl wouldn't love this at their party, and then be able to take a little piece of "cake" home with them?
Cricut Cartridge: Tags, Bags, Boxes & More, Gypsy
Paper: DCWV, Doodlebug Design, AC Cardstock
Paper Punch: Martha Stewart Scallop Dot
Embellishments: Offray ribbon, Imaginisce Roly Rosies
Seriously though, I loved making this cake! This is probably the most satisfying project I have ever made. It sat on my kitchen counter on a cake stand for weeks! I almost shed a tear as I glued it all together because it is going to be on display at my local Joann for an upcoming class.
For those of you who haven't seen these before, the cake is made using the triangle box from the Tags, Bags, Boxes & More cartridge. Put a bunch of triangles together, and what do you get? A cake! The very top layer was made from an embellished paper mache box. Some of the rosettes were made from an Imaginisce Roly Rosies pack, but then I figured out how to do them freehand - even better!
The best part of this project is you can actually use the pieces of the cake to hold party favors. What little girl wouldn't love this at their party, and then be able to take a little piece of "cake" home with them?
Cricut Cartridge: Tags, Bags, Boxes & More, Gypsy
Paper: DCWV, Doodlebug Design, AC Cardstock
Paper Punch: Martha Stewart Scallop Dot
Embellishments: Offray ribbon, Imaginisce Roly Rosies
Labels:
bags and boxes,
Gypsy,
papercrafts,
Tags Bags Boxes and More
Monday, February 7, 2011
FCCB Cricut Crawl - Share the Love!
Welcome to Divine Domesticity and the fourth Fantabulous Cricut Crawl ... Fantabulous Cricut's version of a blog hop!
Valentine's Day is in a week and everyone at Fantabulous Cricut has decided to Share the Love! Each Design Team member will be featuring an original Valentine-themed project that includes the word LOVE somewhere on it.
If you came here from the Fantabulous Cricut Challenge Blog, then you're in the right place because I'm the first stop on the crawl. If you just happened to stop by today, you're still in the right place if you would love to be inspired for your Valentine's Day projects.
Valentine's Day is one of my favorite holidays for a number of reasons: red is my favorite color, it's my son's birthday, and I love sugar!
And isn't this some of the cutest sugar you've ever seen? I would venture to guess that many of you have seen lollipops like this because they're everywhere - I've seen them in New York City at Dylan's Candy Bar, I've seen them at Michaels in Indiana, and many touristy areas. Do you know where they are made? In my town, by a little company called Kencraft. They make the most adorable candies decorated with sugar art. I can even give you a little insider information: this past week they have been filming an episode of Kid in a Candy Story, a great Food Network show. Watch for it around Easter!
Cricut Cartridges: Tags Bags Boxes & More, George & Basic Shapes, Simply Sweet
Paper: Doodlebug Design (glitter paper), AC Cardstock, Georgia Pacific
Embellishments: Doodlebug Design (heart brad), Michaels (ribbon), and don't forget the Hershey's Kisses!
I used my glue gun to glue a foam ball (from the floral dept) in the bottom of the box, stuck the lollipop in the foam, and voila!
Now it's your turn! Let's see your Share the Love projects! Make sure to include a Cricut cut somewhere on your project and the word Love!
Next stop...Angela's blog, Simple Creations Papercrafts. Go see what she has in store for you today... And when you're done, make sure to link up your project to FCCB's Fantabulous Cricut Crawl post to be entered into the contest!
Valentine's Day is in a week and everyone at Fantabulous Cricut has decided to Share the Love! Each Design Team member will be featuring an original Valentine-themed project that includes the word LOVE somewhere on it.
If you came here from the Fantabulous Cricut Challenge Blog, then you're in the right place because I'm the first stop on the crawl. If you just happened to stop by today, you're still in the right place if you would love to be inspired for your Valentine's Day projects.
Valentine's Day is one of my favorite holidays for a number of reasons: red is my favorite color, it's my son's birthday, and I love sugar!
And isn't this some of the cutest sugar you've ever seen? I would venture to guess that many of you have seen lollipops like this because they're everywhere - I've seen them in New York City at Dylan's Candy Bar, I've seen them at Michaels in Indiana, and many touristy areas. Do you know where they are made? In my town, by a little company called Kencraft. They make the most adorable candies decorated with sugar art. I can even give you a little insider information: this past week they have been filming an episode of Kid in a Candy Story, a great Food Network show. Watch for it around Easter!
Cricut Cartridges: Tags Bags Boxes & More, George & Basic Shapes, Simply Sweet
Paper: Doodlebug Design (glitter paper), AC Cardstock, Georgia Pacific
Embellishments: Doodlebug Design (heart brad), Michaels (ribbon), and don't forget the Hershey's Kisses!
I used my glue gun to glue a foam ball (from the floral dept) in the bottom of the box, stuck the lollipop in the foam, and voila!
Now it's your turn! Let's see your Share the Love projects! Make sure to include a Cricut cut somewhere on your project and the word Love!
Next stop...Angela's blog, Simple Creations Papercrafts. Go see what she has in store for you today... And when you're done, make sure to link up your project to FCCB's Fantabulous Cricut Crawl post to be entered into the contest!
Wednesday, January 5, 2011
A fun new tool
I wish I could say that I was having fun with my new Gypsy, but alas, it has been a bit of a headache. Although I must admit, it is not poor Gypsy's (or Provo Craft's) fault. Apparently I have software on my computer that interferes with downloading the Gypsy updates. I finally resorted to asking a kind friend if I could use her laptop to install my updates, and voila! We're up and running. Hopefully I will be able to have some Gypsy posts soon.
The fun new tool that I discovered is the Imaginisce Petal Roller. Who knew such a simple little object could create such beauty! I first discovered this while perusing the Roberts Crafts blog where they had the most gorgeous paper flower wreath project that was made using the Petal Roller. Basically, it is a quilling tool on one end with a stylus on the other. You can see a video tutorial on how to use the tool here.
Today, in between conversations with Provo Craft's tech support, I decided I needed to try and let go of the frustration and regain some of my crafting mojo so I picked up my petal roller and started, well, rolling. After I had my three rosettes I knew I had to decorate a cute little box with them. Can I just say, I love my Expression! It's so nice being able to use that "fit to page" function and create a decent sized box! With the right tools creating is, well, a piece of cake!
Cricut Cartridge: Tags, Bags, Boxes & More, Walk in My Garden (leaves)
Paper: DCWV, Imaginisce, AC Cardstock
Tool: Imaginisce Paper Roller
Ribbon: Offray
Bling: Stickles
The fun new tool that I discovered is the Imaginisce Petal Roller. Who knew such a simple little object could create such beauty! I first discovered this while perusing the Roberts Crafts blog where they had the most gorgeous paper flower wreath project that was made using the Petal Roller. Basically, it is a quilling tool on one end with a stylus on the other. You can see a video tutorial on how to use the tool here.
Today, in between conversations with Provo Craft's tech support, I decided I needed to try and let go of the frustration and regain some of my crafting mojo so I picked up my petal roller and started, well, rolling. After I had my three rosettes I knew I had to decorate a cute little box with them. Can I just say, I love my Expression! It's so nice being able to use that "fit to page" function and create a decent sized box! With the right tools creating is, well, a piece of cake!
Cricut Cartridge: Tags, Bags, Boxes & More, Walk in My Garden (leaves)
Paper: DCWV, Imaginisce, AC Cardstock
Tool: Imaginisce Paper Roller
Ribbon: Offray
Bling: Stickles
Saturday, April 10, 2010
MPS - Challenge!
I love My Pink Stamper Challenges! This may sound really strange to some people, but as much as I love papercrafting I can't just sit down at my desk and tinker. I don't exactly know why - I just know that it's far too easy for me to think of all the other things that I should be doing. I need to have some kind of motivation or inspiration, and challenges do the trick! Today's challenge is to make a project using black, pink and green. And I was finally able to use my new cartridge Preserves. Here are my projects:
Pink Ladybug:
Recipe:
Cricut Cartridge: Walk in My Garden
Stamps: Stampin' Up! Greetings Galore
Ink: Stampin' Up! Whisper White Craft ink
Cardstock: AC Cardstock
Embossing Folder: Sizzix Floral Flourishes
Border Punch: Martha Stewart Arch Lattice
Accessories: Ribbon (Michaels), black eyelets
So Strawberry:
Recipe:
Cricut Cartridges: Bags Tags Boxes & Bows, Preserves
Stamp: Hero Arts Cupcakes
Ink: Memento Graphite Black
Cardstock: Stampin' Up! Pink Passion, AC Cardstock
Embossing Folder: Quickutz Polka Dots
Accessories: Glitter Glue (Studio G), Ribbon (Michaels)
Pink Ladybug:
Recipe:
Cricut Cartridge: Walk in My Garden
Stamps: Stampin' Up! Greetings Galore
Ink: Stampin' Up! Whisper White Craft ink
Cardstock: AC Cardstock
Embossing Folder: Sizzix Floral Flourishes
Border Punch: Martha Stewart Arch Lattice
Accessories: Ribbon (Michaels), black eyelets
So Strawberry:
Recipe:
Cricut Cartridges: Bags Tags Boxes & Bows, Preserves
Stamp: Hero Arts Cupcakes
Ink: Memento Graphite Black
Cardstock: Stampin' Up! Pink Passion, AC Cardstock
Embossing Folder: Quickutz Polka Dots
Accessories: Glitter Glue (Studio G), Ribbon (Michaels)
Subscribe to:
Posts (Atom)