Monday, January 31, 2011

FCCB #45 - Support the Cause

The theme for the challenge this week at Fantabulous Cricut Challenge Blog is Support the Cause.  We were encouraged to make a project based on a cause that is near and dear to our heart.  I thought long and hard about this because there are a number of causes that are important to me:  I have a brother in the military that I am very proud of, and I have lost a number of family members to cancer, just to name a couple.  I decided to focus on breast cancer because although I and my family have been spared so far, as a wife, mother, daughter, woman, and friend it is a disease that hits very close to home.  I will be 38 years old this year and I have had 4 lumps, starting at the age of 21.  Luckily they have all been benign, but there may come a time that that isn't the case, so I think it's important to emphasize that I have been the one to find each one of them.  One of the lumps, I had a number of doctors that couldn't find it unless I showed them where it was.  Self examination is extremely important, as are regular mammograms.  Get to know your boobies - and don't be afraid, be vigilent!


To all of the brave women out there battling breast cancer, I salute you and send all of my hopes and prayers to you.

Cricut Cartridges:  Walk in My Garden, Gypsy Font
Embossing:  Sizzix
Punch:  Fiskars
Paper:  Paper Pizzaz, Georgia Pacific, AC Cardstock
Embellishments:  Recollections (pearls), Stampin Up (eyelets), Stickles, Offray (ribbon)

Thursday, January 27, 2011

Super Yummy Challenge!

For this week's Imagine Pink Wednesday post at My Pink Stamper Robyn used her Cricut Imagine to make the most adorable card!  She also gave us a sneak peek of one of her stamp sets that is being released Saturday at CHA.  It looks like another great one!

Can I just say, I want to go to CHA so badly!  I am trying to talk my sister, who is an avid quilter, into going to the summer CHA in Chicago with me.  She asked me, "So, will there be quilting stuff there?"  Sure!  There will be quilting stuff there - that's a crafty hobby, right?  As it happens, it appears that CHA is very much dominated by the papercrafting industry.  Anybody who has been lucky enough to attend and can give me details about the types of exhibitors, will be greatly appreciated.  I would just love to be able to see all the new products being released, up close and personal.

The challenge that Robyn issued was to create a project (with your Imagine, if you have one) that's YUMMY!


Cricut Cartridge:  Preserves
Stamps:  My Pink Stamper Fruit & Veggie Puns
Paper:  Best Creation, Stampin Up, DCWV
Ink:  Stampin Up

Punch:  Martha Stewart
Embossing:  Cuttlebug Swiss Dots
Embellishments:  DCWV (buttons), Recollections (gems)

Tuesday, January 25, 2011

My Pink Designer - Love!

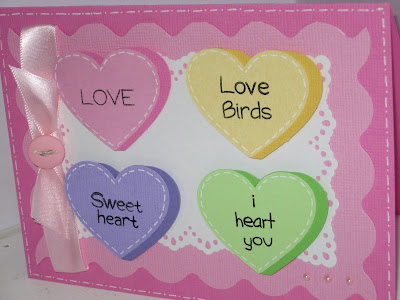
I am loving the theme for this month's My Pink Designer post:  love, and the color pink!  I have two girls so there is plenty of pink in my house, and there are just so many fun things that you can make with a Valentine's Day theme.  What better inspiration than love, pink, and candy!  I have a question though:  as adorable as they are, does anybody really like eating conversation hearts?  Personally, I think they taste like toothpaste!  Now the sour ones, that's a different story.  I like those!  Aren't Robyn's stamps perfect for the little sayings on the hearts?  They're totally Love-Alicious!


Stamps:  My Pink Stamper Love-Alicious
Cricut Cartridge:  Simply Charmed
Paper:  AC Cardstock, Georgia Pacific, Stampin Up
Punch:  Martha Stewart, and the scallop was made using my Coluzzle
Embellishments:  Offray (ribbon), Stampin Up (button), Recollections (pearls), white gel pen for stitching

Be sure to go to My Pink Stamper to check out all the fabulous My Pink Designer projects!

Monday, January 24, 2011

Happy Birthday Robyn!

For the FCCB Challenge post click here.

Today is Robyn at My Pink Stamper's birthday!  And for the occasion she has posted a really fun challenge and giveaway.  So be sure to go over and wish her a happy birthday, and if you would like, participate in the challenge!

Here's the card that I had intended to send to her, but didn't get it in the mail on time.  So here it is Robyn -  Happy Birthday!  I'm the same age, and I wish I could say that I was as excited about turning 40 in a couple of years as you are!  ;-) 


I am continuing to learn more and experiment with my Gypsy.  This is the first time I have planned out an entire project using my Gypsy, and the first time I've welded with it.  Lesson learned:  don't forget that when you're welding to make a card, unless you're absolutely sure what you're welding is perfectly symmetrical you need to flip one of your images.

Cricut CartridgeForever Young (flowers), Walk in My Garden (leaves)
Embossing:  Cuttlebug Swiss Dots
Paper:  Stampin Up, DCWV, Doodlebug Design, AC Cardstock
Embellishments:  Stickles, gem

FCCB Challenge #44 - Neglected Cartridge Challenge

The challenge for this week at the Fantabulous Cricut Challenge Blog is to use a cartridge that you haven't used in over 6 months.  I've only had my Cricut for a year, and honestly, most of my cartridges I've only had for about 6 months!  But there are cartridges I've purchased that I haven't used as much as I thought I would - Walk in my Garden is one of those.  Let's face it, they have come a long way with the newer cartridges.  I especially love the ones that have such great layering to add detail and dimension to the images.  But as far as "older" cartridges go, I think Walk in my Garden is a hidden treasure.  It really is loaded with possibilities.  I especially love the borders.  Since most of my projects have a decidedly "girlie" theme to them, I decided it was time to have something that's more for boys, albeit little boys.  Turtley awesome!  Although, I really wanted to reach for that glitter!


Thank you to the unknown talented individual on Splitcoaststampers where I saw the layout for this card years ago!

Cricut Cartridge:  Walk in my Garden
Stamps:  My Pink Stamper Even More Punny-Licious
Embossing:  Quickutz
Paper:  DCWV, Stampin Up, Georgia Pacific
Embellishments:  DCWV (buttons), Offray (ribbon)

Friday, January 21, 2011

Freebie Friday at Roberts!

It's Freebie Friday once again at the Roberts Crafts Blog.


 They're giving away two DCWV stacks and the Rock Princess Cricut cartridge.  Go check it out, and don't forget to look at all the fun projects they post there too!

Wednesday, January 19, 2011

PKS Sketch Challenge #43

I am very happy to report that I have decided that my Gypsy and I can be friends.  ;-)

I was so excited about getting my Gypsy, and then I had so much trouble getting all the updates installed that I couldn't stand looking at the thing for over a week!  But today I broke down and started watching some how-to videos at My Pink Stamper (she has an excellent Gypsy tutorial that was posted just today actually).  I really needed to learn how to use the thing because I wanted to use the Gypsy Wanderings digital cartridge for my project today.  And it worked!  It's kind of cool how you can plan out all of your cuts on the Gypsy, hook it up to your Cricut, and have it all cut out for you.


Not only did I take the first steps in learning to use my Gypsy, but I think I can also put to rest the debate as to what kind of glitter glue is better.  You know that cheap-o stuff that they have at Joann, and Michaels (I don't want to name any names...) and if you're in Utah, Roberts?  Well they have very nice colors, and it is definitely inexpensive, but I just don't like it.  I bought my first Stickles in December and it is just so much easier to use!  I like how easily it glides on, I like how quickly it dries - it just outperforms the other stuff.  Had I used Stickles for this project I could have had a more subtle line of glitter around the butterfly.  Oh well!

Cricut CartridgeGypsy Wanderings
Paper:  Me & My Big Ideas (stripes), Stampin Up, AC Cardstock
Punch:  Martha Stewart, the scallop on the red cardstock was made with my Coluzzle (remember those?)
Embossing:  Cuttlebug
Stamp:  Stampin Up
Embellishments:  American Crafts (ribbon), DCWV (button), Recollections (pearls), Studio G (glitter glue - oops, I said I wasn't going to name names...)

Monday, January 17, 2011

FCCB Challenge #43 - Sweet Shop

For the My Pink Stamper Blog Hop post click here

I am so excited about this week's challenge at the Fantabulous Cricut Challenge Blog!  I love to bake, especially if it is something sweet, rich, and decadent.  This carries over into my crafting as well.  There are just so many fun images, papers, colors that have a "sweet" theme. 

There were a few steps in the process of creating this card.  I kind of had an idea of what I wanted to do but was needing some inspiration.  So I went to my local Archivers - there's just something about how they have the store laid out that is a feast for the eyes.  The paper I found is from Little Yellow Bicycle, from their Cupcake Love line called Lollipops with Glitter.  Doesn't that sound perfect for this week's theme?  I thought so.  And lucky me, I found the perfect ribbon to go with it at Michaels.


Cricut Cartridge:  Simply Charmed - it's the peppermint with the little ends trimmed off, and I just created my own stick
Paper:  Stampin Up, Little Yellow Bicycle, Roberts Crafts, Doodlebug Design
Embossing:  Sizzix
Ribbon:  Michaels
Punch:  Fiskars Apron Lace
Stamps:  My Pink Stamper - Love-Alicious
Extras:  Heart eyelets (remember eyelets?  I have so many eyelets...)

Friday, January 14, 2011

My Pink Stamper Blog Hop

I am SO excited to be posting for the first time in my role as Pink Designer for My Pink Stamper's first ever BLOG HOP!  Let me start off by telling you a little about myself.  I am a thirty-something (for a little longer) SAHM with 3 children.  My home is now in Utah, but I am originally from the Toronto area in Ontario, Canada (yay Canada!).  I have always liked to work with my hands whether it be crafting, sewing, cooking, or veggie gardening, and had the very best of examples in my very talented and artistic mother.  My love of papercrafting began almost 20 years ago when I got my very first rubber stamps.  I was a demonstrator for a rubber stamp company for 7 years, but didn't get my Cricut until Christmas 2009.  Since then, my creative world has exploded!  It has brought my joy for the art of papercrafting, and my paper fetish, to a whole new level!

The theme for this month's Blog Hop is...

Ha!  You thought I was going to tell you, didn't you?  If you came here from Shauna's blog, then you will find what you need at the bottom of my post.  If you happened upon my blog on your own today, I invite you to go to My Pink Stamper and start from the beginning!  So mysterious...   ;-)

I found these pails at Joann after teaching my class on Tuesday.  They are so cute and very inexpensive and come in some really cute spring colors, plus white.  I filled it up with chocolate hearts, and voila!  I love, love, love, this paper from DCWV.  It's the perfect combination - pink, paisley, flowers, and glitter!  A definite must when you have daughters.


Cricut cartridge:  Forever Young, flower 6 - I curled the petals a little to make the flower stand out
Paper:  DCWV, Paper Pizazz, AC Cardstock
Punch:  Martha Stewart Scallop Dot
Ribbon:  Michaels
Various gems

Here's what you need to carry on with the hop:

Key Word:  SOMETHING
Your next stop:  Raechel at Raechel's Cards

Have fun, and thanks for hopping by!

UPDATE:  For those of you inquiring about the DCWV cardstock, it is called Sweet Berry Pink Glitter.  I found this on clearance somewhere last year, so good luck!  I hope you find some and when you do, let me know!  ;-)

Monday, January 10, 2011

FCCB Challenge #42 - Winter Warmies

This was a great project for me to work on today as I was in my sweats, fuzzy socks, and sweater - I have a bit of a cold.  I woke up to a fresh layer of snow, and a buck in my backyard...again.  I guess I can't complain when the deer are in my backyard this time of year.  At least there isn't a veggie garden for them to eat!

 This is great weather for catching up on all of your indoor projects like replenishing your supply of cards after giving so many away as Christmas gifts.  Maybe you've set a goal for the new year to catch up on your scrapbooking?  Or better yet, stop by the Fantabulous Cricut Challenge Blog and join in on this week's challenge:  Winter Warmies - use some type of winter clothing/accessory on your project (i.e. mittens, sweater, hat, jacket, scarf, etc.)  I just really wanted to make something with mittens on it, so I got these from the mitten border on the Winter Frolic cartridge.


Cricut Cartridge:  Winter Frolic
Paper:  DCWV
Ribbon:  American Crafts
Stamp:  Stampin' Up!
Punch:  Fiskars

Saturday, January 8, 2011

I MADE IT!!!

I am so excited, and honored, to announce that Robyn at My Pink Stamper has chosen me to be one of her Pink Designers!  I was so excited and nervous watching the live broadcast last night.  In the past, almost every time there was a broadcast my husband was out of town so it was really difficult to sit down and watch while I was supposed to be watching my children!  But this time not only was he home but he came in to watch with me.  Isn't that sweet?  When Robyn announced my name I let out a scream of joy, but my chat kept booting me off so I couldn't let her know that I was there, and watching, and SO HAPPY!!!  It was very aggravating...

Thank you so much Robyn, and thank you to my followers both old and new.  I have had so many people visiting my blog and leaving such kind comments and I want you to know how much I appreciate you!


My Pink Stamper

Friday, January 7, 2011

My Creative Time Throwback Thursday Challenge

It's been a little while since I participated in one of Emma's challenges, so I thought I would head over there today.  She does such beautiful work and I find her very inspiring.  Today's challenge is to make a project using an older cricut cartridge, that has a heart on it.  So I took the opportunity to make a Valentine's card for my honey.  I just love it when an idea comes together!  I love tone on tone, and especially white on white.  The beauty of tone on tone is you can play around with different textures and materials to make the elements of your project stand out.


Cricut Cartridges:  Plantin Schoolbook (heart), Wild Card (decorative corners and "Be My Valentine")
Embossing:  Sizzix and Cuttlebug
Decorative Edge:  Coluzzle (blast from the past)
Paper:  AC Cardstock and Georgia Pacific
Ribbon:  generic white organdy (how's that for a description?  ;-) )
Accents:  Stickles, and Darice gems

Wednesday, January 5, 2011

A fun new tool

I wish I could say that I was having fun with my new Gypsy, but alas, it has been a bit of a headache.  Although I must admit, it is not poor Gypsy's (or Provo Craft's) fault.  Apparently I have software on my computer that interferes with downloading the Gypsy updates.  I finally resorted to asking a kind friend if I could use her laptop to install my updates, and voila!  We're up and running.  Hopefully I will be able to have some Gypsy posts soon.

The fun new tool that I discovered is the Imaginisce Petal Roller.  Who knew such a simple little object could create such beauty!  I first discovered this while perusing the Roberts Crafts blog where they had the most gorgeous paper flower wreath project that was made using the Petal Roller.  Basically, it is a quilling tool on one end with a stylus on the other.  You can see a video tutorial on how to use the tool here.

Today, in between conversations with Provo Craft's tech support, I decided I needed to try and let go of the frustration and regain some of my crafting mojo so I picked up my petal roller and started, well, rolling.  After I had my three rosettes I knew I had to decorate a cute little box with them.  Can I just say, I love my Expression!  It's so nice being able to use that "fit to page" function and create a decent sized box!  With the right tools creating is, well, a piece of cake!


Cricut Cartridge:  Tags, Bags, Boxes & More, Walk in My Garden (leaves)
Paper:  DCWV, Imaginisce, AC Cardstock
Tool:  Imaginisce Paper Roller
Ribbon:  Offray
Bling:  Stickles

Monday, January 3, 2011

FCCB Challenge #41 - Snowy Delights

I can't think of a more fitting theme for this week's challenge.  We had a green Christmas here, but then a few days later we got hit by the storm of the season followed by plummeting temperatures.  It is seriously cold and snowy now!  I love snowflakes (unless I'm driving in them) in my crafting projects.  What could be more beautiful?

This week's challenge at the Fantabulous Cricut Challenge Blog is Snowy Delights - make a project incorporating snow or snowflakes.  I have had this snowflake paper by Sonburn for a couple of years now, I guess just waiting for the right project.  These are certainly colors that I never would have thought of using together, but somehow it works!


Cricut Cartridge:  Winter Frolic, When It's Cold Outside
Paper:  Sonburn (Snowflake Circles), AC Cardstock, DCWV
Embossing:  Cuttlebug

Ribbon:  Offray
Punch:  Martha Stewart Scallop Dot
Bling:  Stickles and assorted gems


And last but not least, I'm so excited I could explode:  I had a very Cricut Christmas!  If you have been following me for a while you would know that I scored a Cricut Expression during the after Thanksgiving sales.  Of coarse I wasn't allowed to use it until after it had been wrapped, sat under the tree, and then opened on Christmas day.  Do you know how hard that was?!  But then the piece de resistance, my sweet mother-in-law got me a Gypsy - thankfully at a huge discount!  Let the learning curve begin!  Oh, and I got a pink ATG gun.  Ah, I love the fact that my projects are staying stuck together if you know what I mean!

Saturday, January 1, 2011

MPS Design Team Challenge

It's that time again - Robyn at My Pink Stamper has put a call out for her next design team.  The challenge:  to make a project using her three favorite colors - pink, green, and brown.  Making this Easter topiary is something that I have wanted to do for months, well, since I first saw the idea.  I have to give credit where credit is due:  I first saw the topiary idea here.  So adorable!  But of coarse I had to tweak it a little to make it my own.


The biggest change I made was I wanted to give the flowers dimension, so after cutting them out I used the tip of my glue pen to form the flower around - kind of easing them into making the petals stick out.  Here is what I used:

  • Small clay pot:  painted with acrylic paint and sealed
  • Foam ball and a foam egg:  these you can get in the floral department at your local craft store.  I got mine at Joann.  The foam ball is hot glued into the base of the pot and you need it there to keep the dowel in place.
  • Wooden dowel
  • Easter grass or paper shred
  • Coordinating paper and ribbon:  The paper I used is called Cherry Cobbler by Doodlebug Design, and the cardstock is from AC Cardstock.  The ribbon is from Michaels.
  • Your choice of critter cut:  The bunny and basket came from Create a Critter
  • Silver brads
  • Hot glue gun
  • Lots and lots of flowers:  These flowers came from the Forever Young cartridge, flower5 set on Shadow.  After cutting the flowers I first punched a 1/16th hole, eased them into a "sticking up" position, placed the brad through the hole, glued the underside of the flower around the brad, then stuck it into the foam.  You could also use corsage pins for this - they would be really pretty!
And now to give a little further credit...

It has been one year since I got my first "baby bug" Cricut for Christmas, which also marks one year as a fan of My Pink Stamper.  I discovered Robyn looking for help with learning how to use my Cricut, and I owe the fact that I learned so quickly and had so much fun along the way to her amazing videos and inspiration.  Thank you!
Related Posts Plugin for WordPress, Blogger...